Thursday, July 23, 2015

THANKS A LATTE JULY PAPER PUMPKIN:

Hello there! It's that time of the month again! I just finished up my projects made with the July Paper Pumpkin kit called Thanks A Latte. SU! has really outdone themselves again this month. Succulents, coffee & tea, oh my!

Here's the stamp set included with the kit along with Early Espresso and Cucumber Crush spots.

This is one of the cards made up according to the instructions. There were 3 sentiments and 2 Stampin' Spots included with this month's kit:) It also featured the fun technique Two-Step stamping.

There are so many things you can do with this kit, I was a little overwhelmed at first. But if you know me, you know I love coffee, so I started with that:) I used the Dots & Stripes Decorative Masks to decorate the cups using a Sponge Dauber and Tangelo Twist ink. I then used the marker to define the dots & stripes a bit.

I used the set Gorgeous Grunge for the background splatters in Crumb Cake which I stamped off. I layered a piece of Early Espresso Cardstock underneath and used the same ink as well for the background.

Those cute tiny succulent plants are big right now, so I was thrilled to see them in this month's kit. And they're the perfect kind for me...the kind I can't kill:( I thought it would be fun to make some tags or bookmarks with them and they came together quickly. The windowbox folder...not quite so quickly.

I used one of the included card bases for the tags. I basically cut it into fourths, trimming a little off the sides so it measured 2 1/2" wide. I then took the DSP from the kit and cut it to a 2" strip and punched it with the Scalloped Tag Topper Punch. I added a piece of Cherry on Top Washi Tape, and Cucumber Crush Dotted Lace Trim to the bottom and used a Cucumber Crush Marker. I added a piece of Whisper White Baker's Twine.

I made 4 tags and used another cardstock base to make the folder to hold them. I used the leftover pieces from the tags to make the pockets.

This was my 'over the top' project made with the kit...nothing hard, just time consuming. I used one of the negative pieces from the notebook paper sheet to make the window frame, keeping the little nubs at the bottom to attach the succulents to. I used the scraps to make the window pane trim and glued a Window Sheet to the back.

I used Basic Grey Cardstock to make the siding. I cut 3/4" strips, measuring the width of the card~4 1/4" I think. For the long strips, I put 2 Dimensionals at the bottom and applied Liquid Tombow to the top, on the back of each strip. I started at the bottom and worked up, overlapping just a hair. For the small side pieces, I cut the strips down to 1/2" wide x 3/4", and only used 1 Dimensional at the bottom~actually the skinnier strip along the edge work best for these. Once all the siding is adhered, I attached the window frame using Dimensional pieces.

I stamped the succulents on scrap pieces of cardstock and cut them out. I used Pear Pizzazz, Tangelo Twist, Daffodil Delight & Blushing Bride Markers to color them in. I adhered them to the nubs on the window frame using Liquid Tombow. I then added the shorter plants on top using Glue Dots and a Dimensional for the top one. I then cut out the window box from scraps and attached it by stacking 3 Dimensionals.

Like I said, a little time consuming, but well worth it:)

I used Cherry On Top DSP for this card and I added a little interest to the notebook page. I used a ruler and a Smoky Slate Marker along with my Grid Paper to draw the lines. A subtle touch, but it added so much to this card.

I stamped the cup and sentiment with a Basic Grey stamp pad, which I should have reinked, but it worked. I made a few extra cups by tracing around the die cuts onto scrap cardstock and cut them out. I did that with this card so I could put the plants where I wanted them.

I made a sweet little succulent using Mint Macaron Cardstock and the Itty Bitty Accents Punch Pack. I stamped the leafy plant onto both sides of the Mint and punched out 3 flowers. I curled and scrunched them up and layered them using Liquid Tombow~so adorable:)

For this one, I lightly sponged the cup using a Sponge Dauber and Tangelo Twist pad. I stamped and cut the tea bag out and adhered with a Glue Dot. I used a Crumb Cake Marker to color it. I used  Tangelo Twist and Pear Pizzazz Markers to color the flowers and tucked a piece of a Tea Lace Doily behind the sticker.

I used Sweet Li'l Things DSP for the background, and added a piece of Burlap Ribbon. I also added a Neutrals Button that I 'stamped' in a Basic Grey stamp pad and wiped off.

Here's another card made with Sweet Li'l Things DSP and Early Espresso Baker's Twine. I assembled 2 notebook pieces as directed and butt them up together. For the cappuccino froth, I used the leafy plant image in Crumb Cake ink, cut it out and adhered with Liquid Tombow. I used the Tree Builder Punch for the drops.

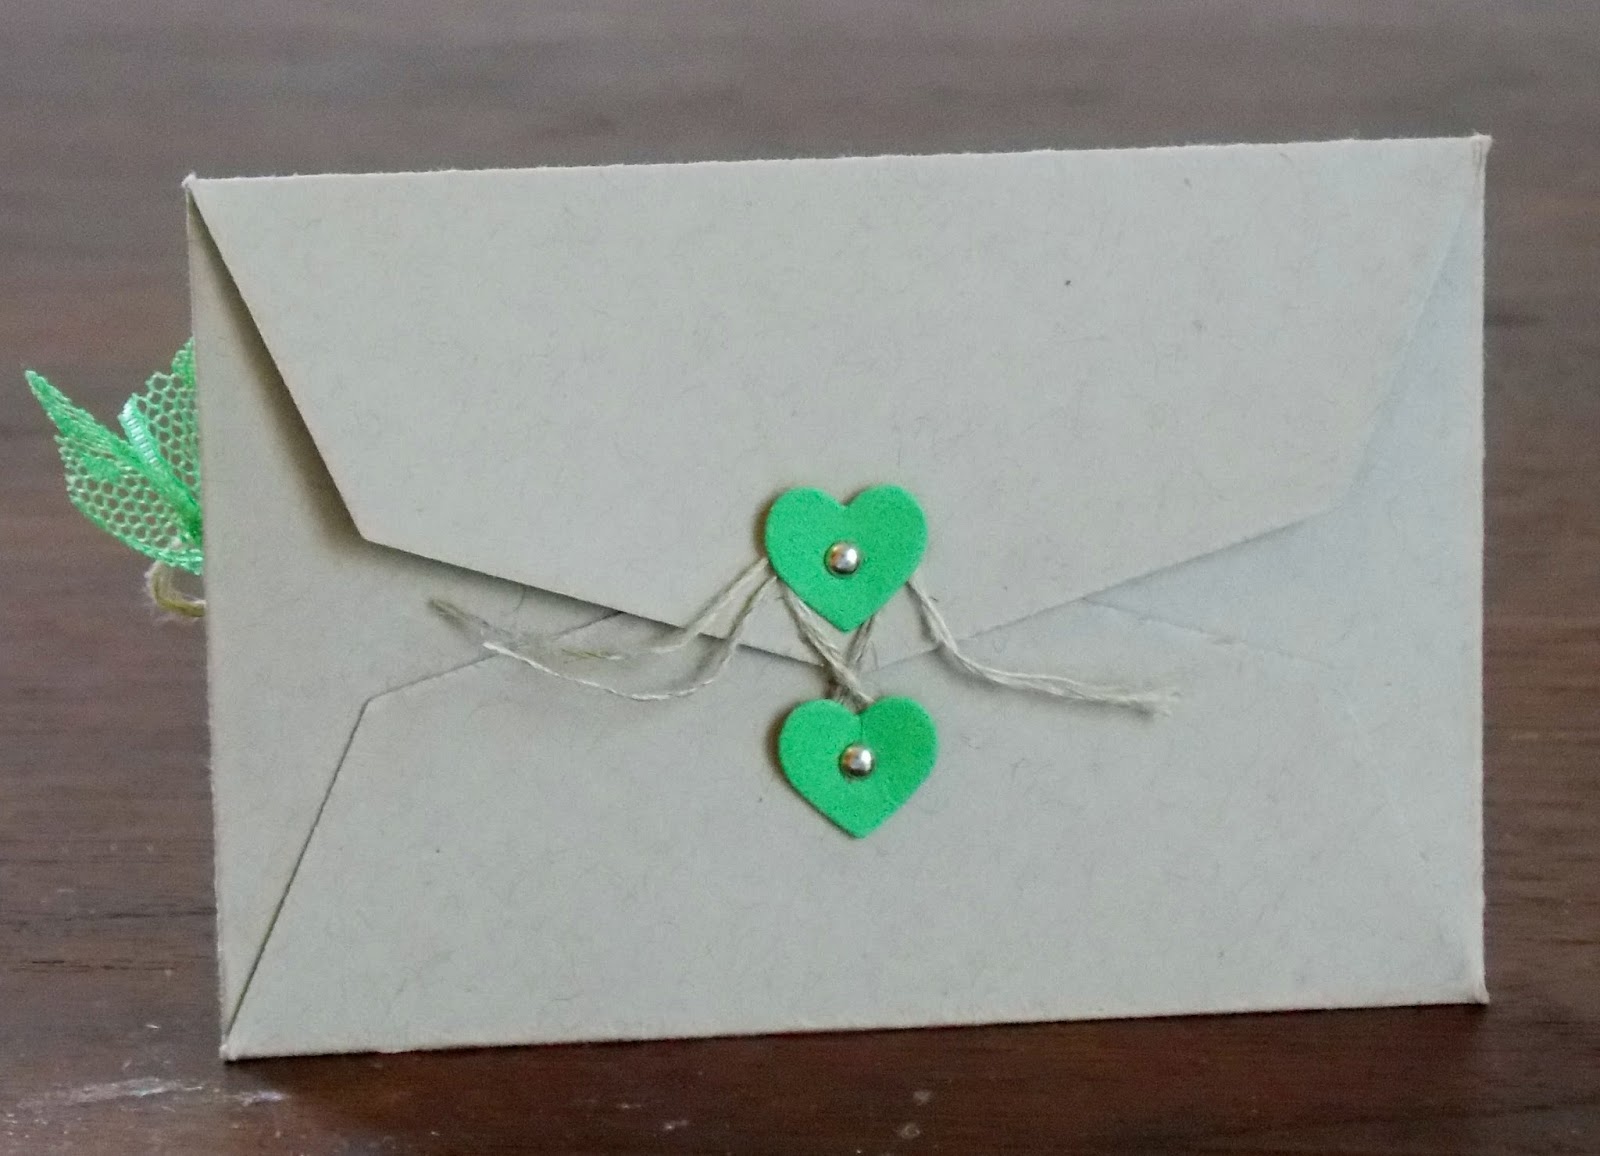
With all these coffee cards,  I knew it was just a matter of time til I'd be needing a Starbucks fix:) It inspired me to make the cute little gift card holder. I used the Gift Card Envelope & Trims Thinlits in Crumb Cake Cardstock.

I used the set Gorgeous Grunge again and Cherry On Top Washi Tape. I added a piece of Cucumber Crush Dotted Lace Trim and a Linen Thread bow.

I used the 1/16" Circle Handheld Punch and Mini Brads with the heart die included with the Thinlits.

My Paper Pumpkin Party is a week from today and I'm getting everything ready for this fun event! My SU! bag is busting at the seams with Door Prizes and I can't wait to give a bunch away:)

I haven't held any events for awhile, so the goodies have really piled up! I'm planning lots of surprises for those attending the event and I'm getting excited for the big day. I'll have stations set up for the alternate projects, so for those attending, please let me know which projects you like and I'll have all the supplies needed to make them. Make sure to look at last month's projects as well and I'll have stations for them in addition to this month's projects. Make sure to bring your Paper Pumpkin kits with you as well. I'll have Grid Paper, Scissors, Bone Folders and Adhesives. You'll have your own stamps and ink, so you won't have to share:)

I'm excited to see my Party Girls in a week, and for the rest of you, thanks so much for stopping by!

Wednesday, July 22, 2015

TEENY TINY WISHES BRIDAL SHOWER CARD:

Hello there! Still plugging away on my Paper Pumpkin, but one of my dear customer friends asked me to make a bridal shower card for her and I wanted to share it with you. Sorry, I couldn't get it to photograph very well, but hopefully you can see it okay. I started with a base of Shimmery White Cardstock. I've had it for years but for some reason, rarely use it. It's kind of in between white and vanilla, so it isn't an exact match to either, but it is lovely.

Next, I used 2 retired embossing folders for the frame and polka dot layer. I love these 2 folders and will probably keep using them forever:) I then found this fancy fold for the dress:  http://paperpaws.blogspot.com/2012/05/doily-dress-folds-tutorial.html. It's made with a Tea Lace Doily, and I made a second one to layer underneath to make the dress fuller and longer.

I didn't have the heart punch that she used for the bodice, but I used my Hearts Framelits...that I had in a box to sell. I guess I'm going to need to hang on to them for awhile. I then folded a piece of Whisper White Satin Ribbon in half and ironed it as it was too overwhelming for the dress as is. I tied a bow and attached it with Glue Dots.
For the bouquet, I started with a Shimmery White circle that I punched out with a 3/4" Circle Punch. I used the Itty Bitty Accents Punch Pack for the white flowers and added the flower from the Tree Builder Punch to the centers and for the Blushing Bride flowers. I then added Basic Pearls and adhered the flowers to the circle using Liquid Tombow. I used the Bird Builder Punch with Pear Pizzazz Cardstock for the leaves and glued them in place. Finally, I punched out a Pear Pizazz circle using the 7/8" Scallop Circle and glued the bouquet to it using Liquid Tombow.

I stamped the sentiment with Smoky Slate ink onto Shimmer White Cardstock and punched it out with the Word Window Punch. I cut one end off and glued the other end to the bouquet. I attached the bouquet to the ribbon using Glue Dots at the top and stacked Dimensionals towards the bottom.

This was a fun card to make and I see more of these in my future. Now back to my Paper Pumpkin...check back soon to see what I've come up with. Thanks so much for stopping by:)


Saturday, July 18, 2015

REMEMBERING YOUR BIRTHDAY EASEL CARD:

 
Hello there! Popping in here quick to share a fun birthday card with you. I needed a special last minute birthday card for a special little 5 year old and Carrie Rhoades came to the rescue! I found her idea and tweaked it a bit:  http://www.carriestamps.com/weblog/2013/07/birthday-cake-easel-card.html. Thanks Carrie! I'm not sure if I've made an easel card before, but it was fun to make:) I started with a piece of Watermelon Wonder Cardstock and cut & scored as Carrie instructed. I used Cherry On Top DSP and the striped paper is from the In Color Envelope Paper.

This is how it will look when it's folded. I added a layer of Whisper White Cardstock to the base and stamped it with Watermelon Wonder ink using the set Remembering Your Birthday.

For an easel card to stand up, you need something for the folded cardstock to butt up against. I used a Brights Button thread with Crushed Curry Baker's Twine on the left side and a sequin on the other side.

I made sure I stamped the top sentiment above the button so it wouldn't show when the card was folded. I scattered sequins from the Blushing Bride Sequin Trim, and attached them with Glue Dots.

I decorated the cake using Watermelon Wonder Dotted Lace Trim adhered to the back side of the DSP and attached strips of Blushing Bride Sequin Trim with Glue Dots over the top. I cut 1/4" strips of Cherry On Top DSP for the candles, and used the Tree Builder Punch for the flames using Crushed Curry Cardstock. I adhered them with Glue Dots. I used the Project Life Corner Rounder Punch to round the corners.

I'm excited to give Gracie her card tomorrow and even more excited to go shopping for a little girl for a change! Thanks so much for stopping by:)

Wednesday, July 15, 2015

JUST KIDDING CARD:

Hello there! Here's another card I'm making up for our church Card Ministry using the set Just Kidding. I love the humor in the sentiments and sometimes a good laugh is exactly what we need when we're going through some rough times. The inside says:..what a stupid system. I started with a Pacific Point base that I ran through the Big Shot using the Tiny Triangles Embossing Folder.

I stamped the image and sentiment with Smoky Slate ink onto Whisper White Cardstock. I colored it in using Blender Pens and Tangerine Tango, Pool Party, Daffodil Delight, Pacific Point & Cucumber Crush stamp pads. I added a piece of Cherry On Top Washi Tape and adhered it to a piece of Schoolhouse DSP.

I added a few staples using the Handheld Stapler & Mini Staples, and some Crushed Curry Baker's Twine. I then attached the DSP to the card front using Dimensionals. Another quick and easy card that's sure to help lighten the load a little bit and brighten someone's day.

You probably won't be hearing from me for a few days as I'm awaiting the arrival of my July Paper Pumpkin and will be busy creating. This month's kit is called Thanks a Latte and I can't wait to see what this kit brings! Thanks so much for stopping by:)

Tuesday, July 14, 2015

HEARTFELT SYMPATHY CARD:

Hello there! Here's another card I'm making for our church Card Ministry using the set Heartfelt Sympathy. I found the idea for this on Pinterest again by a SU! artist. Their design was a vertical card, which I liked better, but I needed a horizontal design to balance out my display board, because I'm anal and have to have an equal amount of each, lol. And pay no attention to the big black blob in the corner. I dropped a stamp on it as soon as I finished it, naturally. I started with a Whisper White base and added a piece of Gold Fancy Foil Vellum. I love that I can adhere this vellum by adding Glue Dots to the backs of the hearts so the adhesive doesn't show:)

I stamped the sentiment on Whisper White Cardstock using black Memento ink and used the Essentials Paper-piercing Pack, Mat & Tool for the border. I layered a piece of DSP from the Neutrals Color Collection underneath and added a piece of a Tea Lace Doily.

Finally, I added a Vintage Faceted Button adorned with Gold Metallic Baker's Twine, and adhered it with a couple of Glue Dots.

Thank you SU! for the awesome inspiration and thank YOU for stopping by today:)

Monday, July 13, 2015

SPRINKLES ON TOP CARD:

Hello there! I have a fun birthday card to share with you using the set Sprinkles on Top. I found the idea for this on Pinterest but changed the colors up. I thought this would work perfectly for my church's Card Ministry, as it would work for anyone:) I started with a Bermuda Bay base and stamped the donuts onto Whisper White Cardstock using Crushed Curry, Cucumber Crush, Watermelon Wonder and Pool Party ink.

I used the 1/8" Circle Handheld Punch to punch a hole in the center and the 3/4" Circle Punch to pop out the donuts. I used the 1/4" Circle Handheld Punch to punch out the bite marks.  Once I got them placed where I wanted them, I went in and stamped the candy image where there were holes. I used Bermuda Bay ink. I adhered the bottom layer with Liquid Tombow, and I used Glue Dots to adhere the top donuts.

I stamped the sentiment on Whisper White Cardstock using a Bermuda Bay pad for the hb and a marker for the smaller sentiment. I added a strip of Cherry On Top DSP and stapled a Whisper White Baker's Twine bow on top using the Handheld Stapler.

Once I got the donuts punched it out, it was super quick & easy to put together. I don't know if I'll be saying that after I make 12 of these, but at least it will take care of my donut fix. Speaking of donuts...off to have Jillian Michaels kick my booty! Thanks so much for stopping by:)

Sunday, July 12, 2015

BUTTERFLY BASICS CARD:

Hello there! I wanted to share a CASE from the catalog that I made using Butterfly Basics and the coordinating Butterflies Thinlits. This set was launched in the Occasions catalog, and I resisted buying it. It's normally not my kind of style, but I'd find myself studying it wondering if I'd use it. Then the new catalog came out with a beautiful sample made with it, and I had to have it. It also featured the Masking Technique, which I haven't done in awhile.

I made a few changes as the pink and green were a little too intense for me, so I toned it down a bit. I started with a Crumb Cake base and stamped the netting image with Whisper White Craft ink. I had to resort to the Stamp-A-Ma-Jig after several failed attempts to line it up evenly. I then stamped the floral image onto a piece of Very Vanilla Cardstock using Tip Top Taupe ink. I stamped the image again onto a piece of typing paper. A post-it note would have been ideal to have something sticky on the back, but I didn't have one big enough. I cut out the flower image, which I'm not gonna lie, took awhile. But once you have it cut out you can use it over and over again as a mask.

I added a tiny bit of temporary adhesive to the back of the flower piece I cut out and laid it over the flower I stamped on the Very Vanilla. I then inked up the fern image in Pear Pizazz and stamped over the flower image. It's a really cool technique in that when you remove the mask, the fern image looks to be layered underneath the flower. I had a few blank spots where the ink didn't adhere, so I used a Pear Pizzazz to fill in a bit, and not very well I might add. I should have looked at the sample better. I used a Blender Pen with Blushing Bride,Pear Pizzazz and So Saffron ink to color the flower.

I stamped the postmark and sentiment with Top Top Taupe ink and the splatter image is from a past Paper Pumpkin kit. I used the same ink but stamped it off first. I added a piece of Mint Macaron Dotted Lace Trim and added the small butterfly in So Saffron on top. I then used the Butterflies Thinlits a second time and cut out the middle sized butterfly using the Gold Foil Sheets.

Finally, I punched a hole in the tag using the 1/8" Circle Handheld Punch and tied a piece of Gold Metallic Baker's Twine through it. I really like how this card turned out and I think I'll be getting some good use out of this stamp set after all:) Thanks so much for stopping by!