Tuesday, April 26, 2016

NO BONES ABOUT IT CARD:

Hello there! Sorry for the break, but I've had 3 painting gigs back to back and this is the first chance I've had to get to my stamp room. A good customer friend asked me to make a birthday card for her chiropractor and the set No Bones About It immediately popped into my head. I started with a Crumb Cake base and added a layer of It's My Party DSP.

I used the retired Halloween framelits to cut out a bunch of bones using Whisper White Cardstock. I then used a Blender Pen and a Crumb Cake stamp pad to add the shading. I adhered them with Glue Dots. I stamped the sentiment with Basic Black Archival ink onto a piece of Crushed Curry Cardstock and added another design from the It's My Party DSP Stack.

I finished it off with a Neutrals Button adorned with Crushed Curry Baker's Twine. I hope they both like it!

It's that time of year again when we have to say good-bye to some beloved stamp sets and accessories.  


http://su-media.s3.amazonaws.com/media/lastChance/2016_NA_RetiredList/Retiring%20List%20Annual%20Occasions_NA_US.pdf

Click on the link to see the list or go to www.lauramellinger.stampinup.net. 

Thanks so much for stopping by!

Wednesday, April 6, 2016

ALTOID MINI ALBUM (Elise):

Hello there! I'm back to share my final Creative Crew project...and my most favorite! We were to come up with a mini album. To be honest, I dreaded this challenge. I don't like to scrapbook and I knew it would be a lot of work and I really didn't have the time, but once I quit making excuses and started on it, I knew it would be well worth it.

Our demonstrator magazine Stampin' Success had a tutorial for this Altoid Tin mini album awhile back and I made one for my grandson Quinten. I promised Olivia I'd make one for the new baby, so I figured I'd kill two birds with one stone. Here's the post for Quinten's album with more specific directions:  http://www.laurasworksofheart.blogspot.com/2015/06/happy-thoughts-june-paper-pumpkin.html.  If this link doesn't work, just go to the right side of my blog and click on June> 2015 where I featured the tin as one of my Paper Pumpkin alternatives.

I used the Love Blossoms DSP Stack from the Occasions Catalog, along with the Neutrals Color Collection DSP Stack. I was supposed to use It's My Party DSP but didn't discover that til I was done, so hopefully they'll forgive me:(  I stapled a piece of Whisper White Satin Ribbon to the top, making sure it was long enough to tide around the album. I used several stamp sets, and for the cover I used Bloomin' Love with Blushing Bride ink on Whisper White Cardstock. I cut the heart out with my Paper Snips and attached it to the DSP and ribbon with Dimensionals. I stamped the sentiment and banner with Whisper White Craft ink onto a Gold Foil Sheet and heat-embossed it with White Embossing Powder. I cut it out with my Snips and attached it to the heart. I strung a piece of retired gold cording through a Subtles Button and attached with a Glue Dot. Underneath the heart, I made a swirl with Gold Metallic Thread and adhered with Glue Dots. I added DSP to the inside top of the tin and ran a piece of retired washi tape around the inside bottom.


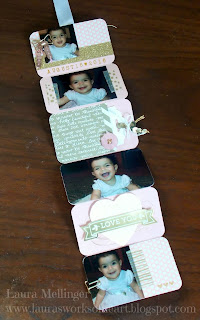
I started with a Blushing Bride base measuring 11 1/2" X 3 1/2". It was supposed to be 12 x 3 1/2 but I didn't have any 12 x 12, so I made this work by extending the top piece with DSP. Each panel measures 2 1/8" x 3 1/2".


I was so excited to finally have a little girl grandbaby after 2 boys. This is Elise and she is almost 8 months old. Her room is gold and pink, so I knew what the color scheme would be. I used the Alphabet Rotary Stamp with Delightful Dijon ink to add her birth date~which I screwed up, but I wasn't going to start over. I'll just glue a 5 over the 6, grrrr. I added strips of gold washi tape and the SAB Metallic Glitter Ribbon, both of which are retired now, but they worked with the color scheme, so I had to go with them:) I added a Bow Paper Clip Embellishment and some Blushing Bride Sequin Trim for some extra cuteness.

I made a little pocket with DSP and added a tag made with Whisper White Cardstock and the Scallop Tag Topper Punch. I added another Subtles Button with gold cording.

I used the set Sweet Stack for the sentiment and added some Gold Sequin Trim and Whisper White Baker's Twine.

I mimicked what I did on the cover for one of the panels and added the hearts in the bottom panel with the stamp set Watercolor Wishes.

I had enough pictures to do the other side, so I had to keep going.

Some panels took a little more work, but for some a few scattered sequins and stamped flowers were enough.
For this panel I cut a strip of  Whisper White Cardstock the same width as a piece of washi tape and adhered it . I added the sequin trim with Glue Dots and layered it all on top of a Metallic Foil Doily.


I used the stamp set Sweet Stack again for the sentiment in the bottom panel and used the same embellishments as in the other panels.

When I finished the  mini album, I used the satin ribbon to hold it togehter by tying a knot.

I used the Project Life Corner Rounder Punch for all the edges so it would tuck inside the tin perfectly.


I was so happy with how this little scrapbook turned out and Olivia was thrilled to have it. Now I'm going to need to make another one for Gabey! Make sure to click on the Creative Crew button on the right side of my blog to see the other projects the crew came up with. Thanks so much for stopping by!

Tuesday, April 5, 2016

BIRTHDAY BLOOMS CARD:

Hello there! I have another project I made for the Creative Crew to share with you today. We were to make a floral card and use Vellum Cardstock as the focus. I started with a Pool Party base and stamped the heart border from Birthday Blooms in Pool Party as well. On top of that I layered a piece of Birthday Bouquet DSP.

I stamped the floral image on a piece of Vellum Cardstock using Whisper White Craft ink and heat-embossed it with White Embossing Powder. I used Blushing Bride, Mint Macaron & Mossy Meadow Markers to color it in. I adhered the vellum to the card base with Glue Dots.

I stamped the sentiment with Pool Party ink onto the same cardstock, folded a piece of Pool Party Glitter Ribbon, and stapled it to the base with the Handheld Stapler & Mini Staples. I added the bow on top with a Glue Dot.

I love this stamp set and DSP and how wonderfully they work together to make such a soft & subtle romantic card. I will definitely be putting this stamp set and paper to work. Make sure to stop back tomorrow for my final Creative Crew project~you won't be disappointed:) Thanks so much for stopping by!

Monday, April 4, 2016

NUMBER OF YEARS CARD:

Hello there! Back today with another card for the Creative Crew. And I gotta say I just want to get this one out of the way. The challenge was to make a  garden project with flowers or veggies with a path leading to a lake. Needless to say by the looks of this card, I struggled with this one! I used the set Timeless Textures for the lake, stamping it in Marina Mist. I used it also for the path using Soft Suede ink.

I used the Number of Years set for the flowers in Hello Honey, Wisteria Wonder, Blushing Bride and Wild Wasabi. I stamped the clouds with Soft Sky ink. I stamped the image onto Watercolor Paper and cut it out with the Ovals Framelits and Big Shot. I then sprayed the image with alcohol hoping it would soften up and look like it was watercolored~it didn't.

I then stamped a piece of Very Vanilla Cardstock and attached the oval with Dimensionals. I added a butterfly made with Dazzling Diamonds Glimmer Paper and the Butterflies Thinlits. I then added the sentiment on top which was stamped with Crumb Cake ink, and adorned it with Venetian Crochet Trim.

I added some Clear Wink of Stella over the stamped images to give it a little extra something...not sure that it helped. I do have to say that the butterfly may have saved this card from the trash can that I was sure it was destined for! (Can you tell that I'm not all that enthused with this project?) Now that this is out of the way, I have a couple more projects to share that I was happy with. Make sure to stop back tomorrow. Thanks so much for coming by:)

Sunday, April 3, 2016

CIRCLE OF SPRING CARD:

Hello there! This is one of the cards I came up with for the Creative Crew this month. We were to make a card using a special fold and incorporate the It's My Party DSP from the Occasions Catalog. I found this Flap Fold design on Splitcoaststampers here: http://www.splitcoaststampers.com/resources/tutorials/flapfoldcard/. I started with a Crushed Curry base and used the stamp set Circle of Spring with Sahara Sand ink onto Whisper White Cardstock. I used the Wonderful Wreath Framelits along with the Big Shot to cut out the wreath and bow.

I used the Circles Framelits to cut out the circle, and used the edge of the die to lightly trace a circle around the cut- out. I then used the Essentials Paper-piercing Template, Mat & Tool to add the detail. The template didn't have a circle big enough, so I moved the template along the pencil line and erased it after the paper-piercing was done. I stamped the small flower onto Whisper White Cardstock using Sahara Sand ink and colored it with a Crushed Curry Marker. I used a 1" Circle Punch and paper-pierced it as well.

I colored the wreath with Crushed Curry, Sahara Sand, Melon Mambo, Blushing Bride & Mint Macaron Markers. I used the Cutie Pie Thinlits with Melon Mambo Cardstock for the scallop border and added a piece of Blushing Bride Sequin Trim over the top with Glue Dots.

I added the It's My Party DSP and stamped the sentiment with Melon Mambo ink from A Dozen Thoughts. I attached the wreath and flower with Dimensionals, making sure to overlap the scallop border so it could be tucked behind the flower.

I finished it off with a Blushing Bride Sequin to the flower center using the Fine-Tip Glue Pen. Make sure to stop back tomorrow for another project. Thanks so much for stopping by:)

Saturday, April 2, 2016

POCKETFUL OF CHEER MARCH PAPER PUMPKIN:

Hello there! I had fun playing with my March Paper Pumpkin last night and couldn't wait to share my ideas with you:) The kit is called Pocketful Of Cheer and features a couple of cute pocket ideas designed to hold a gift card.

Here's the stamp set included with the kit~perfect for so many occasions, and a Bermuda Bay spot.

What was really fun about this month's kit was the special box it came in to commemmorate Paper Pumpkin's 3rd Anniversary, and a thank you note inside announcing that they'd shipped out their One Millionth Kit! To celebrate and thank us they're sending a special gift next month with our kit~an exclusive stamp set called All About Everything~can't wait!

These are the adorable projects made according to the kit instructions.

The first project is a card with a matching envelope that holds a pocket for a gift card. One side is white and the other is this fun floral design.

The second project is a gift card holder~perfect for upcoming graduations or baby showers.

It also has a pocket that holds a gift card and cute little card.

Here's an alternate card I found on the SU! site. SU! just started sending all Paper Pumpkin subscribers a monthly email featuring some additional ideas for using their kits:)

This is another idea from SU! with the addition of a Gold Foil Sheet. I added a bow made with the Bermuda Bay Stitched Ribbon found in the Occasions Catalog.

For this I just added the Bermuda Bay Stitched Ribbon.

I cut the mini card in half using only the front.

For this gift card holder I used Cucumber Crush ink for the balloons and cut them out using my Paper Snips. The gift card holder is reversible as well:)

I used a Cucumber Crush base for this card and added the Bermuda Bay Stitched Ribbon. For the tags, I stamped the flowers with Pool Party ink and used a Bermuda Bay Marker to add the extra detail.

I added a piece of Pool Party Glitter Ribbon and Soft Suede ink for a sweet baby gift card holder.

For this card I started with a Pool Party base and cut apart one of the envelopes included in the kit and adhered it to the card base. I cut down one of the gift card holders as well and adhered.  I used one of the leftover pieces for the Crumb Cake Envelope flap.

And I was able to salvage the rest of the gift card holder and make another one by adhereing the square to the top flap with Liquid Tombow and covering the gap with the stickers. I slid a piece of Bermuda Bay Stitched Ribbon underneath and tied a knot to keep it closed.

Another fun month of Paper Pumpkin and I'm already looking forward to the double-whammy next month! If you want to get in on the extra surprise, just subscribe to Paper Pumpkin by April 10th. Go here for the details:  www.paperpumpkin.com. Make sure to stop back tomorrow to see what I came up with for the Creative Crew this month. Thanks so much for stopping by:)